Friday, July 30, 2010

Tuna Steaks Braised with Radicchio, Chickpeas & Rosemary


I thought I'd continue my attempt to seduce you with recipes from the extraordinary All About Braising by Molly Stevens. So, I prepared her Tuna Steaks Braised with Radicchio, Chickpeas and Rosemary for dinner last week.


I tend to braise beef, pork, and vegetables the most. When it comes to fish, I usually fall back on roasting and sautéing, although I have been known to fry up some pretty good catfish.

Braised fish just isn't a big part of my repertoire.

As I mentioned previously, it is important to mix things up. Writing a blog is very helpful in identifying the
rut that you may be stuck in at any particular moment.

I mean, just how many times can I mention roasting salmon, before I bore you to tears?!

And enough is enough with the pork already!


I am very tired of seared tuna.

Braising tuna is a pleasant change. Marrying the braised tuna with braised radicchio and chickpeas that have first been sautéed with rosemary and garlic infused olive oil produces an unusual yet elegant dinner.


The herbaceous oil and the radicchio and chickpeas are so well suited to each other that I would very happily make only this part of the dish and serve it alone for lunch or as a side to other proteins like grilled rib-eye or roasted chicken.

I think braised chicories are divine, whether it be radicchio, endive, or escarole. Their pleasing bitterness turns slightly sweet and luscious.

We should all be eating more of them!


I used Albacore tuna, but I'm curious if using Ahi tuna would have made an appreciable difference. I may try that the next time I'm feeling a bit more flush.


Braised in this fashion, the tuna is meaty and substantial. While this dish is certainly light enough to be enjoyed as summer-fare, it would be equally appropriate in the winter thanks to its warming soupiness, soft legumes and the use of piney rosemary.


This dish is delicious right off of the stove, but it also tastes terrific the next day served at room temperature. Don't try to reheat it, because it will become a dried out mess!

Tuna Steaks Braised with Radicchio, Chickpeas & Rosemary

1/3 cup extra-virgin olive oil, plus more for drizzling
4 garlic cloves, cut into slivers
2 teaspoons coarsely chopped fresh rosemary
1/4 teaspoon crushed red pepper flakes
1 medium head radicchio (about 6 ounces)
1 cup chicken stock
1 tablespoon freshly squeezed lemon juice, plus more to taste
One 15 1/2-ounce can chickpeas, drained and rinsed (1 1/2 cups)
Kosher salt
1 3/4 pounds tuna steaks (usually 2 good-sized steaks), about 1 1/4 inches thick
Freshly ground black pepper
2 tablespoons coarsely chopped flat-leaf parsley
Fleur de sel or coarse sea salt (
I used Maldon)

Combine the oil, garlic, rosemary, and pepper flakes in a medium high-sided skillet (10- or 12-inches). Heat over low heat, covered, until the garlic is fragrant, soft, and lightly golden, 4 to 5 minutes. Lift the lid frequently to check that the garlic isn't frying or browning. Set aside.

Cut the radicchio in half from core to top. Carve out the small core. Place the halves cut side down on a cutting board and slice into 1/2-inch-wide shreds. Add these to the infused olive oil Return the skillet to medium heat and sauté, stirring occasionally, until the radicchio is wilted, about 5 minutes.

Add the stock, lemon juice, chickpeas, and a pinch of salt to the pan. Bring to a simmer, cover, and simmer gently for 8 to 10 minutes.

Season the tuna steaks on both sides with salt and pepper. Set them on top of the chickpeas and radicchio, and reduce the heat to low. Cover and braise gently, lifting the lid once or twice to check that the liquid is simmering quietly, not violently. If necessary, lower the heat, or set a heat diffuser beneath the pan. After 8 to 10 minutes, the tuna steaks should be cooked halfway through. Carefully turn the steaks. Cover them with some chickpeas and radicchio. Replace the cover and braise gently until the steaks are just cooked through, another 6 to 8 minutes. Prod the center of a steak with a paring knife and peek to see that it's cooked to your liking.

Transfer the tuna steaks to a cutting board and divide into serving pieces. Set the tuna in warm shallow pasta bowls. Stir the parsley into the pan, taste for salt and pepper, and spoon the chickpea-radicchio garnish, along with plenty of liquid over the tuna. Finish each serving with a squeeze of lemon juice, a thread of good olive oil, and a pinch of fleur de sel or coarse sea salt.

Serves 4

Tuesday, July 27, 2010

Nigel Slater's Pork & Lemon Polpettine


I can't tell if I have built up enough cred with you folks to just tell you to try something. My gut tells me to go for it.

Trust me! These gorgeous little meatballs won't disappoint!

In the end, it isn't such a big leap of faith. I'm really asking you to believe in Nigel Slater. That's not so hard to do! He's a good egg, a passionate food-lover, highly regarded author and columnist, and celebrated home chef.

Trust him!

He calls these, "delectably moreish little balls." I find his writing and these scrumptious pork and lemon polpettine equally addictive.


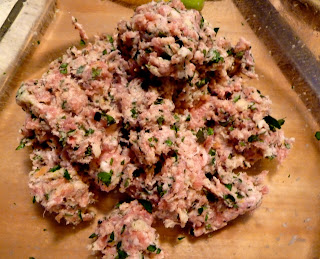
You'll need ground pork, lemon zest and juice, fresh bread crumbs, grated parmesan, thyme, anchovies (I can't get enough of these little suckers, lately!), and parsley. The scent of a sour, salty sea breeze wafts up towards you when you mix these ingredients together.


And that's nothing compared to the aroma of these polpettine when they are cooking.


These little balls become delightfully sticky and crispy, so be sure to use a non-stick pan. After browning them, you let them simmer away in stock for a bit. The result -- a savory pan sauce that is perfect spooned over the polpettine and perhaps some slippery noodles as well.

I served them over a tiny grain-like pasta, but that seemed superfluous. I think the lemon polpettine with their juices drizzled over and perhaps a few slices of tomato and some garlicky greens are really all you need to be quite happy, indeed.


Nigel Slater's Pork and Lemon Polpettine


1 1/4 cups fresh white breadcrumbs
1 pound ground pork
1 lemon, zested and juiced
1 large handful of parsley, chopped
6 large sprigs thyme, leaves stripped from stems
2 heaped tablespoons grated Parmesan
10 anchovy fillets, chopped
Flour, for coating
2 tablespoons olive oil
3 tablespoons butter
3/4 cup chicken stock

Combine the breadcrumbs, pork, lemon zest, lemon juice, parsley, thyme, Parmesan, anchovy in a large bowl. Season with salt and more generously with pepper. Mix thoroughly.

Make eighteen or so small balls of the mixture, using a heaped tablespoon of pork for each. Flattening each ball makes them a bit easier to cook. Roll the balls lightly in the flour.

Heat the olive oil and butter in a heavy non-stick pan. Fry the polpettine in batches -- perhaps eight to ten per. Cook for four or five minutes, until they are crisply golden on each side. Once you have done this with all them, put them all back in the pan and leave to cook through to the middle -- a matter or six to eight minutes more. Don't over-do it with the turning, so they are able to develop a nice crust and don't fall apart.

Pour out most of the fat and add the chicken stock. Leave to bubble for a good two or three minutes, scraping up any crusty bits. Let the stock reduce a bit and then serve the polpettine with the juices spooned over.

Serves 4

Tuesday, July 20, 2010

Dinner Diary: 7/17/10


  • Penne with Swiss Chard, Bread Crumbs, & Anchovy
  • McGrath Farm Strawberries


Canal House Roasted Tomatoes Studded with Garlic


I finally purchased Volume 1 of Canal House Cooking. I had been meaning to since at least last fall.

Oh, how I wish I hadn't wasted so much time.

I can't remember the last time I was this delighted with a book of recipes. Christopher Hirsheimer and Melissa Hamilton's cooking journal beautifully captures their passion and excitement for food.

Their enthusiasm is infectious.


Canal House Cooking is the epitome of what I dream of producing and living -- yes, I am filled with envy (and admiration)! This little journal is gorgeously produced. The photography is dreamy, the writing inspiring, the spirit fun, and the recipes are realistic.

These women speak the romance of food and drink -- Let's make a Pimm's Cup and pickle some watermelon rind! Let's invite a crowd and make paella over an open fire!

I'm in love with them and the life they have created.

Each issue is seasonal and embodies the wonder of its particular time of year.

Hooray for tomatoes! It's summertime!

Even though I was overly optimistic about the ripeness and heft of the tomatoes from our garden, the Canal House roasted tomatoes, studded with garlic served over spaghetti turned out marvelously.


This recipe is actually an adaptation of a Paul Bertolli (the genius behind Fra' Mani salumi, also of Chez Panisse and Oliveto fame) recipe. I love that I had every single ingredient on hand. Of course riper, more luscious tomatoes than those I plucked from the garden, would have made this already stellar dish, sublime.

The idea is that everyone gets their own garlicky, juicy tomato to squash over a nest of pasta -- essentially creating your own personal tomato sauce.

Fun eating, this is!


I'm particularly fond of the use of anchovies, pancetta, and breadcrumbs in this recipe. I always forget it, but I love toasty breadcrumbs with pasta. There is something about the crisp crunch against the slippery noodles that is immensely satisfying.


And when the breadcrumbs are cooked until golden in olive oil, the grease from cooked pancetta, and anchovies that have been melted down? Heaven.

Really.


It may seem insane to turn on the oven in the middle of summer, but it is only for an hour or so. And it is worth it. The tomatoes studded with garlic roast in the oven under a scattering of breadcrumbs and pancetta and a sprinkling of chopped fresh herbs.


The juices accumulate in the bottom of the pan with the extra crumbs during the roasting, just waiting to be tossed with the spaghetti. Just be sure to use juicy tomatoes for ultimate sauciness!


Canal House Roasted Tomatoes Studded with Garlic

1/2 cup diced pancetta
6 tablespoons extra-virgin olive oil, plus more for the pasta
2 anchovy fillets
1 cup coarse fresh bread crumbs
4 tomatoes, tops sliced off, seeds scooped out (use your fingers)
2 cloves garlic, thinly sliced
Small handful fresh thyme, parsley, or basil leaves, chopped (I used a combination of all 3)
Salt and pepper
1/2 pound spaghetti

Preheat the oven to 350 degrees. Fry the pancetta in a skillet over medium heat until browned and crisp around the edges. Use a slotted spatula to lift the pancetta out of the skillet to a plate. Leave the rendered fat in the skillet. Add 2 tablespoons of the olive oil and anchovies to the same skillet. Use a wooden spoon to mash the anchovies until they dissolve. Add the bread crumbs and cook, stirring often,until they are golden.

Put the tomatoes, cut side up, in a baking dish and slip some garlic into each tomato. Mound some bread crumbs into each tomato and scatter pancetta and herbs on top. Season with salt and pepper and drizzle the remaining 4 tablespoons of oil over all. Roast the tomatoes in the oven until they have browned a bit and the interior is supple but the tomatoes have not collapsed, 1 - 1 1/2 hours.

Cook the spaghetti in a large pot of boiling salted water. Drain. Return the pasta to the pot and stir in some olive oil and some of the oily tomato juices from the bottom of the tomato roasting dish.

Serve the spaghetti with the roasted tomatoes and their juices spooned on top.


Friday, July 16, 2010

Dinner Diary: 7/13/10 -- Hanger Steak with Compound Butter


  • Sautéed Curly Kale with Red Pepper and Garlic
  • Charred Shishito Peppers from Jacqueline and Fe's Garden
  • McCall's Hanger Steak with Compound Butter


Returning to the idea of reinventing dishes with sauces and other clever finishing touches, I dug deep into the recesses of my memory on Tuesday night.

Back in Santa Cruz, when I worked in a restaurant, we made a fair amount of compound butter. We used it to finish many dishes, but Stilton butter on New York steak was the biggest hit.

Compound butter is easy to make. You can use it on steamed vegetables, grilled chicken, pastas, and it is especially nice on steak.

You simply soften butter, preferably a high fat content European butter, and add assorted flavorings of your choosing. Garlic, shallots, fresh herbs, wine, and blue cheese are some of the typical stars of compound butter.

Smash it all together and slather it on whatever you please. Corn on the cob would be spectacular with compound butter smeared on it.

You can refrigerate it for a few days or you can roll into a log in wax paper and freeze it for future use. Simply slice off a round for your next grilled rib-eye or baked salmon fillet.

Tuesday Night's Compound Butter

6 tablespoons softened European butter
1 clove garlic, minced
1 small shallot, minced
A handful of fresh parsley and tarragon, chopped
Salt and freshly ground pepper

Cream the butter a bit, until well softened. Add the garlic, shallot, and herbs. Mix until well-combined. Season to taste with salt and pepper.


Wednesday, July 14, 2010

Paula Wolfert's Sizzling Shrimp with Garlic & Hot Pepper


Lately, I am so-so on shrimp. When I was a kid, shrimp were a bigga deal. Now, more often than not, shrimp just don't turn me on.

It makes for a complicated relationship with the crustacean.

Because they are such a snap to prepare, I always keep a bag in the freezer. They're very handy on those evenings when you're desperate because there is nothing in the refrigerator to cook and there is no way that marketing is an option.

Maybe I was simply fed up with the the garlic, white wine, and parsley tossed over pasta or pilaf preparation. Perhaps all I needed was a shrimp recipe that would breath new life into our partnership.

I have found a recipe that has begun to bring the romance back.


In one of the October 2009 Los Angeles Times' Food Sections that my mother saved for me, I stumbled over a Paula Wolfert recipe for Sizzling Shrimp with Garlic and Hot Pepper. It's adapted from her book, Mediterranean Clay Pot Cooking.

That this recipe could be realized in just twenty minutes was a shocker. Wolfert is the queen of Mediterranean cooking, and her recipes are brilliant, but are almost always highly involved, time consuming beasts. No surprise here -- she is a major proponent of the Slowfood movement.

I've made her Sizzling Shrimp many times. You should too! It is delicious and lots of fun to eat.


Please don't panic about all of the olive oil.

You do not have to eat it all! I always have a pool left in the bottom of the pan. Though, you will probably be tempted to dunk just one more piece of bread into the smoky, spicy, garlicky bath.

If you have a Spanish cazuela, now is the time to put it to use. I turn to the bottom half of my Flameware tagine. Of course, you could use a cast iron skillet, if that's what you've got.


The garlic and Aleppo pepper is slowly warmed in the olive oil, until it begins to sizzle and the garlic is just turning golden. The kitchen smells fantastic and you begin to toss a salad. The shrimp cook for four minutes -- at most.


The table should be set with a trivet, because you'll proudly carry the dish to the table for all (could be 4 to 6 friends sharing an appetizer or more likely, just A. and me sitting down to dinner) to tear into.


Eating shrimp with your soon-to-be oily fingers and mopping up the sauce with crusty French bread is definitely a satisfying way to reignite the flames of passion -- for shrimp!

Sizzling Shrimp with Garlic and Hot Pepper

1 pound peeled small (about 60) or medium-large (24 to 30) deveined shrimp
1 scant cup extra-virgin olive oil, preferably Spanish
1 tablespoon finely chopped garlic
1 teaspoon mildly hot dried red pepper such as Aleppo or Marash
2 tablespoons hot water
1/2 teaspoon sea salt
1/4 teaspoon sweet pimenton de la Vera (smoked Spanish paprika)
4 to 6 slices chewy country bread

Rinse the shrimp and wipe dry with paper towels. Leave them at room temperature for 10 to 15 minutes so they are not cold when they hit the pan.

Combine the olive oil, garlic and hot pepper in the cazuela. Set it over medium-low heat and warm the pan slowly, gradually raising the heat to medium or medium-high until the oil is hot. Continue to cook until the garlic sizzles and just turns golden, 2 to 3 minutes, stirring occasionally.

Immediately add all the shrimp and cook until they are firm and curled, 2 to 4 minutes, depending on their size.

Sprinkle with 2 tablespoons hot water and pinches of sea salt and pimenton. Serve immediately from the pot with the bread for soaking up the delicious oily sauce.


Dinner Diary: 7/12/10


  • McCall's Paprika Sausage & Sautéed Onions
  • Creamy Polenta
  • Rocket & Romaine with Lemon Vinaigrette


Tuesday, July 13, 2010

Dinner Diary: 7/11/10 -- Cucumber Ginger Yogurt Sauce


  • Sautéed Red Swiss Chard
  • Black-Eyed Peas with Smoked Paprika
  • Sliced Tomatoes with Red Onion & Basil (all from Jacqueline & Fe's garden!!)
  • Roasted Salmon Fillet with Cucumber Ginger Yogurt Sauce


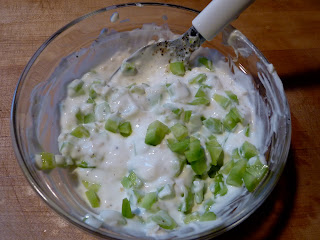
In an attempt to continue my study of sauces and effort to add variety, I put together this yogurt based sauce. Scouring the refrigerator, I gathered cucumber, ginger, garlic, and lemon.

I like that there is no mayonnaise in sight, here -- I'm not a big fan.

In fact, it wasn't until just this moment that I realized that there are two Ns in the word!

This is a very simple, refreshing yogurt sauce, but it tastes great with salmon (and probably barbecued chicken too!) and definitely steers me away from what I typically pair with fish -- a tarragon, chervil, or chive vinaigrette.

Cucumber Ginger Yogurt Sauce

1 cup whole milk Greek yogurt, preferably Fage
1 teaspoon minced garlic
1 tablespoon minced or grated fresh ginger
1 cucumber peeled, and chopped
Salt and freshly ground pepper
Freshly squeezed lemon juice to taste

Combine all the ingredients. Taste for seasoning. Spoon contentedly over whatever protein or vegetables you are eating.


Dinner Diary: 7/09/10 -- Seared & Simmered Kurobuta Pork Chops


  • Sautéed Bordeaux Spinach with Garlic
  • Roasted Asparagus
  • Baked Sweet Potato
  • Seared & Simmered Bone-In Kurobuta Pork Chops


So far this Dinner Diary exercise has been good for me. It's reminding me that I need to strive for variety and the new.

It's easy to cook pork chops for dinner, but how can I make them a little bit different, a little more exciting -- besides adding a cup of cream?

I'll get you that recipe some time in the fall.

I like to flip through Mark Bittman's How to Cook Everything for new ideas. He does suggest that you will find out how to cook everything in his massive tome. I feel like every time I open it, I am challenging him.

It's fun!

A good pan sauce or frankly any kind of sauce can help jazz things up. And sauces are what have been on my mind of late.

I don't typically simmer pork chops, but this recipe produced very moist and juicy results, and leaves you with a rather nice pan sauce to dribble over.

This is what Bittman suggests (along with eight other ideas), and what I served last Friday night. Really simple, straightforward and satisfying. The super-high-quality Kurobuta pork chops from McCall's in Los Feliz guaranteed a fabulous dish.

Seared & Simmered Pork Chops

4 pork chops, about 1 inch thick
Salt and freshly ground pepper
2 tablespoons extra virgin olive oil
1/2 cup dry white wine
1 teaspoon minced garlic or 2 tablespoons minced shallot, onion, or scallion (I used garlic)
1/2 cup chicken, beef, or vegetable stock or water
1 tablespoon butter or more olive oil (I used butter)
1 tablespoon freshly squeezed lemon juice or vinegar (I used lemon juice)
Chopped parsley for garnish

Sprinkle the chops with salt and pepper. Put a large skillet over medium-high heat for 2 or 3 minutes. Add the olive oil; as soon as the first wisps of smoke rise from the oil, add the chops and turn the heat to high. Brown the chops on both sides, approximately 4 minutes total.

Reduce the heat to medium. Add the wine and garlic and cook, turning the chops once or twice, until the wine is all but evaporated, about 3 minutes. Add the stock, turn the heat down to low, cover, and cook for 10 to 15 minutes, turning the chops once or twice, until they are tender but not dry. When done, they will be firm to the touch, their juices will run just slightly pink, and when you cut into them, the color will be rosy at first glance but quickly turn pale.

Transfer the chops to a platter. If the pan juices are very thin, cook, stirring and scraping the bottom of the pan, until the liquid is reduced slightly. If they are scarce (unlikely), add another 1/2 cup of stock or water; cook, stirring and scraping the bottom of the pan, until the liquid is reduced slightly. Then stir in the butter or a few drops of oil over medium heat; add the lemon juice, pour over the chops, garnish with parsley, and serve.


Thursday, July 08, 2010

Pork Pot Roast with Apricots, Cardamom & Ginger


I have a few cookbooks. I haven't cooked from every one of them. Some have been disappointing. And others have been knock-outs.

Of these, there are a couple of TKOs.

Hovering around the top of that list is Molly Stevens' All About Braising. There is a reason why this book won the James Beard Book Award.

It is brilliant.

I've made a lot of Stevens' dishes. Over time, I bet that I will try them all, because I have not been disappointed once. It is a very rare cookbook that delivers so consistently.


I decided to make her Pork Pot Roast with Apricots, Cardamom & Ginger for Father's Day, because A. had previously raved about it and I felt sure that it would be a hit with my parents and sister -- it was.


The dish follows tradition by pairing pork with fruit. However instead of apples or pineapples, this recipe goes a more colorful and exciting route, using dried apricots. Happily, this makes it seasonally appropriate any time of year.


The apricots and the mirepoix appear to melt together during the long slow braise. The pork begins to fall apart, its softness marrying gorgeously with the saucy fruit.


The use of exotic spices like cardamom, turmeric, and ginger gives the dish a heady perfume, and an unusual flavor that permeates the meat. The garlic, cayenne, and orange zest add a contrasting zing to the other warm spices.

I used Cognac and Vermouth instead of Apricot Brandy and white wine, as Stevens suggests. These worked very well.


All of the recipes in All About Braising follow a detailed map. They require time and a bit of concentration.

Stevens has taken an almost scientific approach to braising, dissecting the process and presenting it in a straightforward step by step plan -- preparing the meat, browning the meat, adding the aromatics, preparing the braising liquid, the braise itself, and finally the finish.


She wants us to use an appropriately sized Dutch oven that just contains the meat and other ingredients. It should be cozy in there!

Well, looking at the pictures you'll see that I did not quite come through here. My smaller oven tends to burn on the bottom. What I really need -- okay, want might be the more accurate word -- is an oval Dutch oven.

A., are you listening?


Stevens is also fairly insistent about using a sheet of parchment under the lid of your pot, to ensure that all of the moisture stays inside, for optimal braising conditions. I have now incorporated this into my braising protocol.


I believe it was Stevens' enthusiasm for kitchen scales in All About Braising that encouraged me to finally purchase one. And what a blessing it has been. The scale takes all the unnecessary guesswork out of cooking.

You always know that you are on the same page as your cookbook's author.


What Stevens asks of us makes sense because of her thorough explanations. And in the end, the proof truly is in the pudding.


The results are spectacular.


Pork Pot Roast with Apricots, Cardamom & Ginger

One 4 1/2 to 5-pound boneless pork shoulder roast, preferably Boston butt
Coarse salt and freshly ground black pepper
2 tablespoons extra-virgin olive oil
1 medium leek, white and pale green part only, coarsely chopped (about 1 cup)
2 carrots, coarsely chopped
1 medium yellow onion (about 6 ounces), coarsely chopped
6 cardamom pods, husks split and discarded, seeds lightly crushed
1/2 teaspoon ground turmeric
1/4 teaspoon cayenne
1 tablespoon minced or grated fresh ginger
2 large garlic cloves, peeled and bruised
3 strips orange zest, removed with a vegetable peeler (each about 3 inches by 3/4 inch)
1 bay leaf
2 tablespoons apricot brandy or Cognac
1/2 cup dry white wine or dry white vermouth
2 cups chicken stock
1 cup dried apricots (about 6 1/2 ounces)

Heat the oven to 325 degrees

Trim any especially thick bits of fat from the pork, but do be sure to leave some. Roll and tie the pork (or have your butcher do it for you).

Pat the pork dry with paper towels. Season all over with salt and pepper. Pour the oil into a Dutch oven that will hold the pork snugly (4 to 5 quart works well), and heat over medium heat. Sear the pork on all sides, until deeply browned but not at all burnt, 15 to 20 minutes total. Transfer the pork to a plate.

Discard all but 1 tablespoon of the fat, and return the pot to medium heat. Add the leek, carrots, and onions, stir in the crushed cardamom, turmeric, and cayenne, and cook, stirring once or twice, until the vegetables begin to soften but do not take on much color, about 5 minutes. Add the ginger, garlic, orange zest, and bay leaf and cook until the spices are quite fragrant, another 2 minutes.

Pour the brandy into the pot. Bring to a boil and boil, stirring and scraping the bottom of the pot with a wooden spoon to release any caramelized bits, until reduced by about half, about 1 minute. Add the wine and let it boil for 4 minutes, scraping the sides and bottom of the pot. Pour in the stock and bring to a boil. Add the apricots and boil for another 2 minutes.

Place the pork on top of the vegetables and fruit. Add any accumulated juices from the plate. bring the liquid to a simmer and spoon some over the pork. Cover the meat with sheet of parchment paper, pressing down so that it almost touches the meat and the edges extend over the sides of the pot about an inch. Cover and slide the pot onto a shelf in the lower third of the oven to braise. Check that the liquid is simmering gently, every 30 minutes and give the pork a turn. If the liquid is simmering too aggressively, lower the oven heat 10 or 15 degrees. Continue to braise gently until the pork is fork-tender, about 2 hours in all.

Remove the pork from the pot and set it on a carving board or platter to catch the juices. Cover loosely with foil, and let rest for 10 minutes.

Return the pot to the top of the stove and skim off as much surface fat as you can with a wide spoon. If the sauce is very thin reduce it by boiling over medium-high heat for about 5 minutes. It should be the consistency of a thick vinaigrette. Taste for salt and pepper. Pour any juices that have accumulated under the pork into the sauce, and stir.

Remove the strings from the pork, and carve into 1/2-inch-thick slices. Serve with sauce and apricots.