Showing posts with label hors d'oeuvres. Show all posts

Sunday, April 10, 2011

Bagna Cauda


When we had dinner a couple of months ago at Mozza for their Tuscan beef night, one of the standouts of the evening had nothing whatsoever to do with cow. The bagna cauda that kicked off the evening was spectacular. It has been haunting me ever since.


Bagna cauda basically translates from the Italian to hot bath in English. From Piedmont, Italy, it is a pungent hot dipping sauce composed of olive oil, butter, garlic, and anchovy. From there it is open to interpretation. I added lemon zest and lemon juice and I'm glad that I did. Raw vegetables are dunked into the bath and furiously gobbled up.


There are plenty of dishes where anchovies are used to great advantage and the recipe will tell you that your guests will never even guess that anchovies are in the dish. This is not one of those. It is all about the anchovies and garlic. And holy smoke, married together in melted butter and olive oil, they make an addictive pair.


I tried to finagle the recipe for Mozza's version out of Chef Chad Colby to no avail, but in the end it really isn't complicated. It requires a bit of mashing and melting. That's all. The lemon zest and juice that I added, gave the dish just a hint of zing and brightness.


You can use almost any kind of vegetable. Celery and cardoons are classic. I went with baby fennel, chiogga beets, celery, baby carrots, cauliflower and radishes. Vegetables never tasted so good!


The bagna cauda was the start of a crazy Cioppino dinner party that we had last weekend. The raw oysters and the Cioppino were divine, but the bagna cauda was hands down my favorite part of the meal.

Bagna Cauda
3 cloves, peeled and chopped
10 imported anchovy fillets, chopped
1 stick (4 ounces) unsalted butter
1/2 cup extra-virgin olive oil
1/2 teaspoon finely chopped lemon zest
4 teaspoons fresh lemon juice
Kosher salt to taste

Using a mortar and pestle mash the garlic and anchovies to a paste.

Place the butter and olive oil in a smallish saucepan. Add the paste and bring to a simmer over low heat. Simmer for five minutes or so. Remove the pan from the heat and add the lemon zest and lemon juice. Season with salt, if needed.

Serve with raw vegetables.

Serves 6 (This was actually plenty for 8 of us, with some left over, but really it depends on the kind of people you hang out with.)


Saturday, November 27, 2010

Happy Thanksgiving Cheese Puffs


A belated Happy Thanksgiving to you all!


I meant to shoot up a storm and take pictures of every aspect of our Thanksgiving dinner, but things never go the way you plan when you're cooking like a mad woman and entertaining. Even though the truth of the matter is that my mom did most of the heavy lifting.

Shh.


That woman is a rock star when it comes to the barbecue and when it comes to turkey. A gorgeous, crispy-brown, barbecued turkey was the centerpiece of our Thanksgiving meal. I'm not going to tell you how to do it, but I have to recommend preparing your bird this way at least once. It tastes smoky and fantastic.


We supped on carrot and cilantro soup, stuffing with dried apricots, giblet gravy, candied sweet potatoes with raisins, sautéed spinach with pine nuts, garlic and currants (one of my contributions) and cranberry sauce.

Of course we had sliced canned cranberry jelly on the table as well, because there are always at least two people in every family who do not want to give it up for anything.

Pumpkin pie -- yes sir! With whipped cream or crème fraîche.

But what I really want to tell you how to make is cheese puffs.


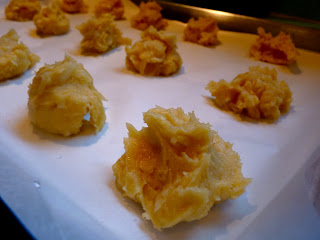
I was the most proud of the ultra-cinchy to make French Cheese Puffs from Canal House Cooking Volume 2. This is one of those recipes that makes you look like a sophisticated pro in the kitchen.


The puffs themselves are the height of sophistication -- airy and light, yet rich and buttery. These cheesy beauties are an elegant start to a fête -- definitely spectacular with a bottle of something bubbly. I see these as a natural for an intimate New Year's Eve dinner party with a bottle of Veuve Cliquot.


I used the exceptional Irish Kerrygold butter and a cave-aged raw milk gruyère. Delicious ingredients always help. You'll need to do a little heating, a fair amount of stirring -- at times vigorously -- and some spooning. Twenty minutes in the oven and that is all.

I actually completely forgot about the penultimate step in this recipe -- brush the dough with milk. I suppose my cheese puffs would have been shinier, but you couldn't tell that anything was missing at all.


Be sure to time things right, so that you are serving these warm, just moments out of the oven. These were a big hit with everyone from my husband and mother-in-law to nearly two-year old Fe.


If for some strange reason you have leftovers, store them in the fridge and heat them up for breakfast the next day. They won't be as amazing, but the warm cheesiness will start your day just right.


Canal House Cooking French Cheese Puffs

8 tablespoons butter
1 1/4 cups milk
2 pinches salt
Pepper
1 cup flour
4 large eggs
1 cup grated Comté or Gruyère cheese

Preheat the oven to 400 degrees.

Heat the butter and 1 cup of the milk over medium heat in a heavy saucepan until the milk is hot and the butter melted. Add the salt and a couple of grindings of pepper.

Lower the heat to low, and dump in all the flour at once. Stir vigorously, until a dough forms a thick mass and begins to pull away from the sides of the pan.

Remove the pan from the heat and beat in the eggs one at a time, until each egg is completely incorporated into the dough before adding the next. The dough will be smooth and shiny. Stir in the cheese.

Spoon walnut-size spoonfuls of dough onto parchment-lined sheet pans. They should be about an inch apart. Brush the tops of the puffs with the remaining milk to make them nice and shiny.
Bake until puffed up and golden, about 20 minutes. Serve warm.

Makes about 3 dozen.

Monday, October 25, 2010

Chicken Liver Crostini


My friend Therese noticed that I shared her enthusiasm for David Tanis' A Platter of Figs, and came up with a smart idea. Why not share our excitement and efforts with friends? Have a Tanis potluck of sorts, focusing on one or two of the seasonal menus in his book.

Last Saturday night, after several months of emailing back and forth, seven of us, pots, bowls, and bottles in hand, showed up at Therese's home to feast together.

And feast, we did! I personally am racked with guilt over how much delicious food we ate. And for me, this was after an orgy of food the night before at Mozza's five course tasting of food from the Veneto (much more on this later, I promise!).

We gorged on Fish Soup with Mussels and Chorizo, Green Lasagne with Greens, Roasted Pepper Salad, and a sprightly green salad. And then finished up with not one, but two desserts -- Panna Cotta, and Italian Plum Cake. Everything was aptly executed, so the eating was very good, indeed.

And with a gang of teachers, poets, lexicographers, and curators -- foodies all --the conversation was lively and compelling. It looks like this may very well become a quarterly celebration for us.

To start, most of us enjoyed the rustic chicken liver crostini that I whipped up for the occasion. The exceptions being the one vegetarian and my liver-and-fowl-phobic husband, who could barely even glance at the dish, let alone dignify it with a taste.


In the end, it was his loss, because the flavor of the chicken liver was excellent. Tanis' recipe calls for either duck or chicken livers. I started out looking for duck livers, but when this became too much of a challenge, I switched to Jidori chicken livers from McCall's Meat & Fish Co. in Los Feliz. You shouldn't feel sheepish about using chicken. They tasted great.


This paté is not a refined, ultra-creamy, liver mousse filled with loads of heavy cream and butter. When I say rustic, I mean it. The texture is coarse and very country, due to the fact that there is no puréeing. The livers are hand chopped and then butter is mashed into them.


My initial reaction to this paté, was to put it down as too crude. In revisiting it at the party with a glass of Prosecco, and even the following morning, I definitely developed an appreciation for this humble liver preparation.


I do have deeper longings for a luxurious mousse with some cognac and perhaps more complexity of flavor, but this is an hors d'oeuvre that is good to know. The thyme, pancetta, and shallot assure a good flavor profile, and this is really quite simple to execute. Even the least experienced cook should have no qualms tackling this.


Tanis suggests toasting slices of baguette. I prefer slicing the baguette on the bias and very lightly brushing the slices on both sides with olive oil and then baking them in the oven at 400 degrees. The crostini seem to keep better that way.


In his fall menu, Another Early Autumn, Tanis serves the duck liver crostini with a roast Double Duck Breast with Baked Figs. My guess is that serving these all together would be a lesson in decadence that I would be very pleased to learn.

I hope to give the duck breasts a go, as soon as I can get A. out of the country.


Chicken (or Duck) Liver Toasts

1 1/2 pounds chicken (or duck) livers
Salt and pepper
2 tablespoons olive oil
2 slices pancetta, in small slivers
2 large shallots, finely diced
2 teaspoons chopped thyme
A splash of dry sherry or sherry vinegar (I used the vinegar)
4 tablespoons butter, softened
1 baguette, sliced and toasted

Trim the livers of any connective tissue or fat, and blot them dry on paper towels. Season with salt and pepper. Heat the olive oil in a large pan over medium heat. When hot, add the pancetta and shallots and cook until browned.

Raise the heat to high and add the livers. Stir and continue cooking. Shake the pan every so often. Cook until the livers are still pink in the center. Add the thyme and sherry, and turn the contents of the pan out onto a large cutting board. Let cool.

Chop the liver mixture into a rough paste. Transfer the paste to a bowl and smash in the butter with a wooden spoon. Taste for salt and pepper. Cover tightly with plastic. Serve at room temperature.

Serves 8


Wednesday, September 08, 2010

Tomato and Ricotta Toasts


I spend so much time thinking about what to prepare for dinner that lunch all but falls by the wayside. During the week when it's just Fe and me, it doesn't matter so much.

On the weekends when A. is around, I should be trying harder. There is an art to making a lovely lunch, and I need to master it. Running out to the nearest taco shop becomes a sorry excuse for lunching after a while.


I think I was on the right track on Saturday. I stepped back and assessed what I had on hand -- lots of beautifully ripe tomatoes, a giant whole-grain demi-miche, a tub of ricotta, herbs growing in the garden, a handful of shallots, a small basket of garlic and a container of micro-greens from the C.S.A. Clearly the makings of something good.


I perused the summer section of David Tanis' A Platter of Figs and bumped into the perfect inspiration for what I had on hand -- Cherry Tomato Crostini with Ricotta. No, I didn't have cherry tomatoes and there was nary a loaf of ciabatta in sight, but with a little tweaking on my part a lovely summertime lunch was within reach.


I used about five medium-sized tomatoes. Halved cherry tomatoes will make for a perkier and much neater presentation. I will likely prepare this recipe again tonight with yellow pear tomatoes, as something to tear into with drinks. But if there are no tiny tomatoes on hand, I wouldn't hesitate to make this anyway.

You're basically making little toasts -- crostini or bruschetta. I'm calling them toasts, because of their complete lack of consistent shape.

Very rustic.

I laughingly love that term. It dresses up anything that is a bit of a mess!

So as I said, no ciabatta. That shouldn't stop you. Any baguette, country boule, or substantial loaf would work fine. Use what's on hand! Just hack it into slices or wedges that are about a half inch thick. They need a little girth to support the fresh ricotta and tomatoes.


The sweetness of the tomatoes and the creaminess of the ricotta are punctuated by a serious kick from the raw garlic and shallots. The bite is no joke, and will likely be with you most of the day, but it provides a pleasing contrast. Throw in the basil and these toasts taste just like summer.


Of course, macerating the shallots in red wine vinegar does take the edge off a little bit. In fact next time I make this, I will cool my heels a bit longer than my impatience allowed for this time, and let the shallots sit for about ten to fifteen minutes.


So that you can learn from my mistakes -- a bit of advice. When making crostini, bruschetta, or toasts, please use a timer. If you are at all distracted like I am, you may be making two or three batches before you are ready to eat. When the bread is turning golden, you have very few moments before it turns black!

I know you know this. So do I.

That doesn't always help! A timer does.


If you use the timer and avoid remaking the toasts, this is quick work. You make a vinaigrette, pound some garlic, fold in the tomatoes, and make toast. When the toast is golden brown, you lightly rub it with garlic, and slather on the (hopefully excellent quality) ricotta. Sprinkle a little salt and red pepper over that, and mound the tomato mixture on top. A sprinkling of basil chiffonade is all that's left to do.


Cherry Tomato Crostini with Ricotta

1 large shallot, finely diced
2 tablespoons red wine vinegar
Salt and pepper
1/2 cup olive oil
2 garlic cloves, smashed to a paste with a little salt, plus another peeled garlic clove or two
2 pounds cherry tomatoes, halved
1 loaf Italian ciabatta
1/2 pound fresh ricotta
1 teaspoon red pepper flakes
A handful of basil leaves

Macerate the shallot with a little salt in the red wine vinegar. Whisk in the olive oil. Add the garlic paste and the tomatoes. Season with salt and pepper and mix. Let marinate for a few minutes.

Cut the bread into 1/2-inch slices. Toast the bread on both sides until golden under the broiler. Rub the toasts lightly with the garlic clove. Just gently, there is already plenty of garlic present.

Slather on a tablespoon of ricotta per toast, and set on a platter. Sprinkle with a little salt and red pepper. Spoon the tomatoes over. Sliver the basil and strew about the toasts.


Friday, June 18, 2010

Fava Bean Purée


If you've been to a few meals at our home, you've more than likely bumped into this fava bean purée. It is a staple in my hors d'oeuvres arsenal. Toast up some crostini and we're well on our way. Add a couple of cheeses and some imported olives, and we are set to entertain.

With spring come fava beans. It's early spring through early summer that is the best time of year for these fellows. As the season begins to turn, the beans change from lovely, small, and bright green to large, starchy, and pale yellow-green. The smaller beans are best for a quick sauté or short turn in the pan with a glug of cream.

The clunkier ones are best for a purée like this one.

Sometimes, like on this last trip to the farmer's market, I find myself getting lazy and only selecting the massive fava bean pods. You can make much quicker work of these big boys.


If you are able to find smaller favas this late in the season, you really ought to take advantage of them. They will lighten up the purée a bit -- making it less sticky and dense -- and coax out a more brilliant green.

Some people shy away from preparing fava beans, because there is a bit of labor involved in getting to the actual beans.

They require two levels of recovery.

First they need to be shucked from the pod and then each bean needs to be peeled. Once the shucking is complete, a thirty second blanching helps speed up the peeling process dramatically.


I hate washing spinach, but fava bean preparation has never bothered me. It's almost soothing.

Aside from the standard fava prep, this recipe is a breeze. It could easily be jazzed up with garlic, mint, or rosemary, but I almost always prepare it straight.

It's thanks to Grilled Cheese Night at Campanile that I became such a huge fan. Nancy Silverton and Mark Peel (back when they were still an item) served their fava bean purée with braised bacon and shaved pecorino. Every time it was on the menu, I had to order it.

To my delight, the recipe for their fava bean purée is one of the first included in their book, The Food of Campanile. After making it once, you probably won't even need to look at the recipe again.


You need the fava beans, some excellent olive oil, a lemon, and salt. With so few ingredients, you need to make sure that they are all top notch.


Even if crostini are not your thing (and really, they should be, since put anything on top and presto -- hors d'oeuvres!), this makes an excellent filling for ravioli, or an unusual layer on a spectacular sandwich.

Then there's one of my personal fava-rites: a very satisfying lunchtime bruschetta with a shaving of parmigiano and a drizzle of olive oil. Enjoy!


Fava Bean Purée

1 pound fresh fava beans, removed from pods (4 pounds in the pods)
1/2 cup extra-virgin olive oil
Kosher salt
Fresh lemon juice

Bring a large pot of water to boil and add 2 tablespoons of salt. Fill a large bowl with ice water.

Blanch the shelled fava beans in the water for about 30 seconds. Immediately scoop out and plunge the beans into the ice water for about 30 seconds. Drain the beans.

Using your fingers, remove the peel of the fava beans by pinching off one end of the skin and gently squeezing the bean out of the skin. Reserve the shelled and peeled fava beans in a medium saucepan.

Add the olive oil and about 1 teaspoon of kosher salt. Over high heat, bring to a gentle boil. remove the pan from the heat, and allow to cool for about 10 minutes.

Using a rubber spatula, scrape the beans and oil into a food processor. Process only until the beans achieve a creamy consistency. Take care not to over-process. Correct the seasoning to taste with kosher salt and fresh lemon juice. Serve immediately, or allow to sit for up to 4 hours at room temperature.